Android Asymmetric Multiprocessing on i.MX7: Remote Core Sensor Data Streaming in Java
Introduction
Android is an open source operating system AOSP where the Android kernel is a derivative work of the Linux kernel. It is very widespread: most of the mobile devices adopt it as an operating system. Most of its applications are written in Java. Thanks to the simplicity of Android and thanks to the presence of much documentation and tutorials, it is very easy for developers to create their first app. The code is absolutely straightforward for a typical application developer: using Java as a programming language, the application can show buttons, tables, pictures, videos or anything based on a solid UI framework which introduces concepts like activities (the main application container), fragments, views, etc. This is in fact one of the most successful paradigms: any Java developer can be an embedded developer on an Android based embedded device.
However because the nature of the Android operating system was initially conceived for smartphones, the Android SDK sometimes does not cover the interaction with specific custom hardware that remains under the regular layer for app development, unless it is specifically integrated in the SDK by passing through the Android HAL (Hardware Abstraction Layer).
In another Technical Note, we have presented Asymmetric Multiprocessing on the NXP i.MX7 where a Master core (Cortex A-7), running a Linux or Android Kernel, interacts with a remote core (Cortex M4). In particular we have also presented two specific applications on Linux and Android where the MPU core exchanges data with the MCU core, running RTOS, which reads sensor (IMU) data.
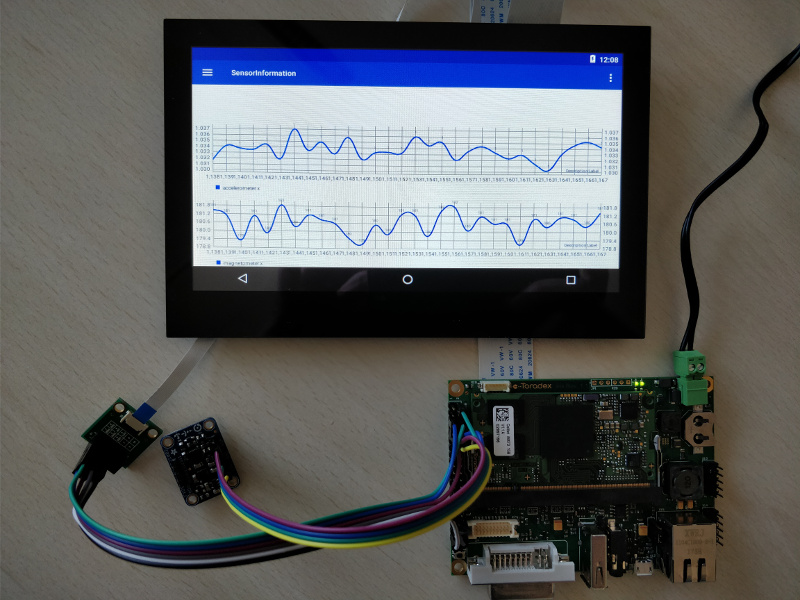
In this Technical note, we are doing the final step to actually making the sensor data available to an Android GUI which displays visually, the sensor data.
What is JNI?
One of the most obvious deficiencies of Java (because its portability) is the impossibility of interacting directly with the hardware: there are no APIs written in Java which allow the developer to directly call Java methods to interact with specific sensors on an embedded board where the application is running. For that reason sometimes there is the need for a Java program to interact with the lower layers of the operating system and most of the time such layers are written in other languages like C/C++.
The Java Native Interface (JNI) provides support for interacting with native code like C or C++. JNI is able to map native methods which interact directly with the hardware to a higher application layer (managed by Java). The philosophy is quite straightforward: the Java code simply loads the native libraries (.so or .dll) in which the native methods are implemented, declaring the native methods within the respective Java classes.
The syntax of JNI is not very different from the one used in C or C++. For this work, we used C as a native programming language. The naming convention we used for the native function is:
Java_{package_and_classname}_{function_name}(JNI_arguments)
Java_com_kynetics_ampsensors_device_DeviceManager_openDeviceNative(JNIEnv *env, jobject instance) {...}
where arguments typically are:
- The env pointer is a structure that contains the interface to the JVM. It includes all of the functions necessary to interact with the JVM and to work with Java objects.
- The argument obj is a reference to the Java object inside which this native method has been declared.
The JNI framework does not provide any automatic garbage collection for non-JVM memory resources allocated by code executing on the native side. Consequently, native side code assumes the responsibility for explicitly releasing any such memory resources that the native code acquires.
Implementation
The purpose of this demo is to make it easier for the user to access and display data gather from the sensor chip (which features an accelerometer, magnetometer and gyroscope) attached as an external device to the i2C bus of board. The data are plotted in real-time in graphs according to the mode chosen by the user. The user can choose between two modes:
- NORM shows data as the norm (module) of each vector (ACC, GYRO, MAG)
- VECTOR shows the components of each vector (ACC, GYRO, MAG)
The tools used are:
- Android Studio (version 3.1). It is the official IDE (Integrated Development Environment) for Google's Android OS design specifically for Android development.
- Toradex Iris carrier board with the Colibri i.MX7 SoM with three sensors accelerometer, magnetometer and gyroscope.
- NXP FXOS8700 IMU Breakout Board
The Java part of the application is organized into three packages, each with a specific purpose.

UI Package manages:
- how the activity and the fragments appear
- how the plots of the points are arranged into the fragment space according to the mode chosen by the user.
Java classes of this package interpret the setting associated to the values they receive and show the corresponding plot type. The plots for NORM mode show one plot for each sensor (ACC, GYRO, MAG). There are three plots for each sensor in VECTOR mode. The default mode set is NORM. The libraries used for the plots can be found at this link.
Device Package manages primarily device operations like open and close a connection towards the rpmsg device from which it can read values coming from the sensors, in example:
public void openDevice(DataType dataType) {
        if (this.deviceDescriptor == null) {
            assert this.fileChannel == null;
            this.deviceDescriptor = this.openDeviceNative();
            try {
                RandomAccessFile raf = new RandomAccessFile(this.deviceDescriptor.devicePath, "rw");
                this.fileChannel = raf.getChannel();
                Channels.newOutputStream(fileChannel).write(dataType == DataType.VECTOR_DATA ? 1 : 0);
            } catch (IOException e) {
                e.printStackTrace();
            }
            this.streamConsumer.onStreamOpen(Channels.newInputStream(fileChannel), dataType);
        }
    }
public enum DataType {

    VECTOR_DATA(3), NORM_DATA(1);

    private final int dimension;
    private static final int SIZE_OF_FLOAT = 4;

    DataType(int d) {
        this.dimension = d;
    }

    public int getBufferSize() {
        return this.getSampleCount() * SIZE_OF_FLOAT;
    }

    public int getDimension() {
        return dimension;
    }

    public int getSampleCount() {
        return this.dimension * Sensor.values().length;
    }
}
The math package manages all of the operations related to reading (consumption) the flow of values coming from the device. First of all, managing the main thread for gathering the data by reading a chunk of data from a buffer:
public void onStreamOpen(InputStream inputStream, DataType dataType) {
    // snippet
    this.inputStream = new DataInputStream(inputStream);
    this.buf = new byte[dataType.getBufferSize()];
    this.floatArray = new float[dataType.getSampleCount()];
    this.dataMatrix = new float[Sensor.values().length][dataType.getDimension()];
    …
}
…

private void readChunk() throws IOException {

    inputStream.readFully(buf);
    ByteBuffer buffer = ByteBuffer.wrap(buf).order(ByteOrder.LITTLE_ENDIAN);
    FloatBuffer fb = buffer.asFloatBuffer();
    fb.get(floatArray);
    }
…

private void transformData() {
        for (int sensorIndex = 0; sensorIndex < dataMatrix.length; sensorIndex++) {
            for (int coordinateIndex = 0; coordinateIndex < dataMatrix[sensorIndex].length; coordinateIndex++) {
                dataMatrix[sensorIndex][coordinateIndex] = floatArray[sensorIndex * dataMatrix[sensorIndex].length + coordinateIndex];
            }
        }
    }

private void doStep() throws IOException {  // called by the Thread
        this.readChunk();
        this.transformData();
        for (int j = 0; j < dataMatrix.length; j++) {
            for (int i = 0; i < dataMatrix[j].length; i++) {
                this.plotUpdate.onDataReady(new Entry(index, dataMatrix[j][i]), Sensor.values()[j], Coordinate.values()[i]);
            }
        }
        index++;
    }
Because the stream appearance depends on the mode chosen by the user, if the mode is set to NORM, the stream comes with the first value for accelerometer, the first for magnetometer, the first for gyroscope, the second for accelerometer and so on. If the mode is set to VECTOR, first the stream provides the three values for accelerometer, then those for the magnetometer and so on.
The values to be plotted are constantly refreshed and shown in real time to the user.
JNI
JNI was used to perform the write, read operations on the rpmsg device from the Java code. The native library developed for this demo contains the native methods to be called when one of these operations is needed. The library is loaded by the Java code which has to perform native invocations in the following way:
    static {
        System.loadLibrary("native-lib");
    }
Then native methods are declared as:
private native DeviceDescriptor openDeviceNative();
private native void closeDeviceNative(int fd);
Open Device:
Java_com_kynetics_ampsensors_device_DeviceManager_openDeviceNative(JNIEnv *env, jobject instance)
rpmsg_ctrl0 device which creates the endpoint used for the inter-core communication,
int fd_ctrldev = open("/dev/rpmsg_ctrl0", O_RDONLY);
ioctl()
int ret = ioctl(fd_ctrldev, RPMSG_CREATE_EPT_IOCTL, &ep);
open() and allows to handle device-specific input and output operations on the specific endpoint which is /dev/rpmsg0.
The file descriptor id and the path related to it are stored and returned back to the Java-side by:
jclass jcls = (*env)->FindClass(env,“com/kynetics/ampsensors/device/DeviceManager$DeviceDescriptor”);
jmethodID cstr = (*env)->GetMethodID(env, jcls, "<init>", "(ILjava/lang/String;)V");
…
jobject obj = (*env)->NewObject(env, jcls, cstr, fd_ctrldev, retstr);
Close Device
Java_com_kynetics_ampsensors_device_DeviceManager_closeDeviceNative(JNIEnv *env, jobject instance, jint fd)
fd_ept = open("/dev/rpmsg0", O_RDONLY);
close(fd);
The problems that are encountered with this approach where we are using only one endpoint is the synchronization of the open and close native operations and the read and write operations made by Java code. Every time the user switches from one mode to another, a check is carried out to control if an open device already exists: if that is the case, then the close operation is performed on that device and, only afterwards, a new open device operation is executed.
In order to guarantee synchronization and avoid misreading of the streaming coming from the sensors, some usleep(500000) have been added after the ioctl operation: this guarantees the correct creation (or destruction) of the device.
If the user taps on the exit button, a close device operation is called (after the usual check on the existence of an opened device).
Kynetics cares about sharing its works: for this reason here you can find the source code of this project.